IRAN ART EXHIBITION: WHAT THINGS MAKE YOUR ASTROPHOTOGRAPH PERFECT?
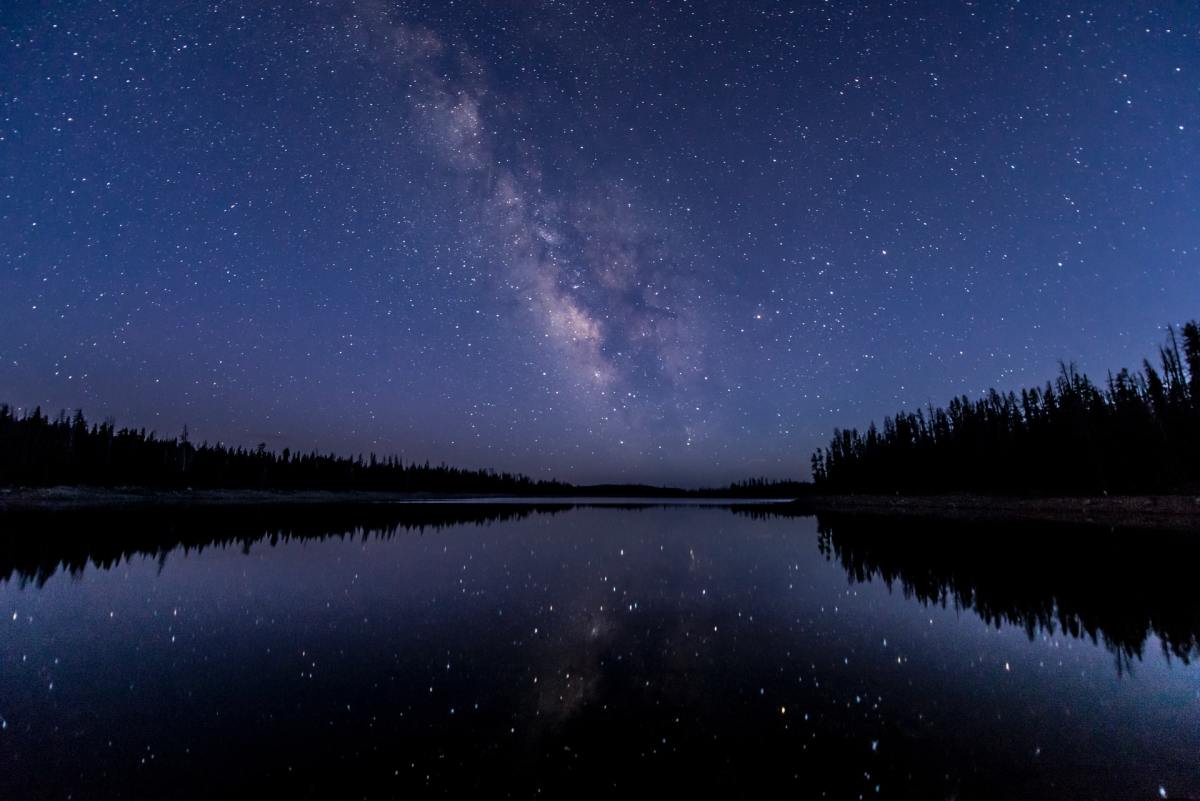
When taking photos of the Milky Way or creating star trails, a little planning and the right equipment can produce some amazing results.
When I was 17, I packed up and left for my first camping trip to the Adirondack mountains. That night we walked out into a clearing and I was stunned at the huge cluster of stars sweeping across the sky. That cluster was the Milky Way. I aimed my point-and-shoot camera skyward hoping to capture this cosmic moment. What I got wasn’t a gorgeous photo, but a disappointing exposure that came out completely black.
Years later, my shots of the night sky got markedly better. As cameras improved and I could afford a basic DSLR, I experimented with exposure times, learned techniques and tricks, and finally got some more illuminating results. But if you’d rather ascend astrophotography’s learning curve a little more rapidly, you can.
Here’s a step-by-step walk through, detailing the gear, apps, and techniques you’ll need to capture your own images of our vast and beautiful cosmos.
Get a Good Camera
For the most part, astrophotography divides into two styles. There’s long exposure shots, showing stars streaking across the sky in a dizzying array of circles. Then you have short exposure shots, which is your more traditional glamor photos of the Milky Way.
To capture either one, you’re going to need a camera that’s better than an iPhone or a cheap point-and-shoot. That means you’re looking for a DSLR with interchangeable lenses and manual controls. More expensive full-frame cameras have really great low-light sensitivity compared to tinier sensors on most other cameras, whether a pocket-friendly Canon or your run-of-the-mill smartphone. If you opt for a small sensor, your images will be plagued with noise and color shift—things that distract from the stellar beauty of your composition.
That doesn’t mean you need to spend thousands of dollars on a camera. An entry-level DSLR camera and lens combination can still create great shots. The Canon Rebel series is a good one for astrophotography. Although the included lens will deliver decent images, you’ll want to spend extra to get a lens with a wide angle and a wide aperture. This allows you to shoot faster exposures, giving you better quality and lower noise in the image file.
A wide angle lens is my preference (10mm, 12mm, or 24mm) but you can use a longer lens depending on how much of the Milky Way and the surrounding scene you want to capture. Remember: A longer focal length will create star trails in only a few seconds instead of keeping the stars focused in the photo. Rokinon manual lenses are relatively inexpensive, and they allow you to dial in the focus with the markings on the lens. The Rokinon lenses are available for several camera brands so you should not have trouble finding it for your camera.
IRAN ART EXHIBITION: For my setup, I am currently using a Fujifilm XT-1 along with the Rokinon 12mm F2.0, adding up to about $2,000. But if you wanted to go with a cheaper option, an older Canon Rebel camera along with a Rokinon 12mm F2.0) lens runs about $850 and would still deliver stellar results.
Slow and Steady
When it comes to astrophotography, a tripod is a must, not an option. Creating these images can be a slow business compared to the blazing shutter speed of your average photo. If the cameras moves during an exposure, even a fraction of a fraction of an inch, your entire composition will likely be ruined.
To keep things steady, I use a SLIK carbon fiber tripod because it’s lightweight, which you’ll appreciate when hiking around in the dark for that perfect shot. It’s also wise to bring along a gorilla pod if you need a bit more flexibility with the surrounding terrain.
If you’re in less than ideal conditions—say, it’s windy—then you can weigh down your tripod by attaching your camera bag. You can also prevent camera shake by using the remote control or setting the camera to the self timer so the camera has time to settle after you press the shutter button, which can sometimes cause its own shaking.
Lighting the Way
I use a headlamp on a very low setting to find my way around the camera without accidentally affecting the exposure. A headlamp is also very handy to see dials and buttons while leaving your hands free to set up the shot at night. Something like the ThruNite headlamp has a very low setting and uses easy-to-find AA batteries.
I can also use a flashlight to illuminate or “light paint” parts of the nearby landscape to add interest to the photo. Light painting can be done while your camera is making the long exposure or as a separate exposure and added into the scene using Photoshop. I like to take a look at the area before the sun sets to get an idea of what would look interesting in the foreground and still allow for a large area of the sky in the photo.
Good Apps for Good Snaps
Moonphase, or moongiant.com, are handy apps determining the darkest times of the month. This is the best time for stellar photography, whether a new moon or a time at night when the moon has set several hours earlier. However, you’ll still want to check the weather since pesky cloud cover can equally doom your photo shoot.
IRAN ART EXHIBITION: Certain techniques will still turn out great photos in less than ideal conditions. But if you’re just beginning to explore astrophotography, I’d plan for the darkest, clearest sky possible, so be sure to plan your trip around these moon phases and experiment with exposures.
For tracking light pollution, Dark Sky Finder or lightpollutionmap.com can help find the darkest areas away from city lights. Living in the Northeast, I plan trips to the High Peaks region of the Adirondack Mountains a few times a year during the new moon to (hopefully) capture the best night sky.
It’s All About Technique
As with most things, the best way to become a stellar astrophotographer is to practice. Get out there, start snapping shots, and learn from your mistakes, which will be numerous at first. A few quick tips can help you scale that initial learning curve.
Start by setting the camera to manual focus. The Rokinon lenses have markings on the lens to set the focus manually to infinity and usually works well for me. You can fine tune the focus by using the live view feature set to exposure simulation mode and zooming way into a bright star. If this doesn’t work, try focusing on a friend standing in the distance (100 ft or more) holding a flashlight or headlamp. I’ve also set up the camera just before sunset and focused on a distant tree, doing this also helps get an idea of your composition if you plan to include trees or buildings in the shot. Of course, there is always trial and error, too, but can take a frustrating amount of time to get just right.

IRAN ART EXHIBITION: The weather can change and clouds can obscure your sky view. You have to be willing to accept you won’t get any photos on the night you planned.
Once I have focus and a good composition, I usually take a few exposures at f/2.0, ISO 1600 or 3200 for 20-30 seconds to get a shot of the Milky Way. Note: that the longer the focal length of the lens, the shorter the exposure has to be if you want a clear photo.
Be sure when taking photos, you’re shooting in RAW file format. If you use Photoshop or an image editing software, you’ll be sad if you only have JPEGs to work with. The RAW file records a much wider dynamic range of information and will allow you to make adjustments in Lightroom and Photoshop with more control and better results. However, RAW images gobble up much more room on your SD card, so you’ll want to be sure you have enough space when you head out for a session.
With some patience it will become easier to set your camera to the right settings and position. I have spent hours looking at what other astrophotographers are making and I continue to learn new ways to use these techniques to create new and interesting compositions.
How To Take Star Trail Photos
As the earth rotates on its axis, stars change position, so opening the camera shutter for a long time with the north star (Polaris) visible in your composition will put it at the center of a giant swirl of stars. The longer the total exposure time, the further around the sky the stars will create a light streak.
Star trails take a long time to get right. Plan to be outside for several hours.
To get the shot below, I set the ISO to 400 at f/2.0 and left the shutter open for 10 full minutes to see where the stars are rotating. Then, I recompose and try longer exposures. Most cameras will allow you to set the camera to a maximum exposure of 30 seconds which is not long enough to create star trails. Using a separate programmable remote control called an intervalometer (this one is for a Canon specifically), you can open the shutter for a programmed amount of time or use the locking trigger switch to open the shutter and then time the exposure. I find my Fujifilm X-T1 does well with exposures up to about 20 minutes before there is too much noise. It also helps to experiment with a few different angles and camera positions near trees or other landscape elements to give the star trails more context.
You can also try a method called photo stacking to create the same swirl of stars with a series of short 20-30 second exposures then combine them in photoshop. There are too many steps to explain in this article, but right here is a good place to start.
Pro tip: My first attempt at shooting star trails was with a Canon Rebel XSi and the EF-S 10-22mm. On VERY cold nights the sensor in your camera will stay cold enough to allow you to shoot longer exposures with a lower than normal amount of noise.
A Little Help From Friends
You can find out more about astrophotography online and with tons of great Youtube videos. I have learned tons from the amazing astrophotographer Ian Norman at his site, lonely speck. He also has several video tutorials that help explain much more of the basics.
There are also many ways to edit a single shot of the Milky Way since you won’t always have the battery-life to use on hours of long photo sequences. Ian has tutorials on post-processing and this video from the The Finer Photo, also helps tweak your photos to perfection.
There is software, other than Photoshop and Lightroom, that are custom-made for astrophotography. Called StarStax, this software allows you to create a video from multiple images. It’s amazing.
IRAN ART EXHIBITION: But the best advice of all is: Be patient. The movement of the heavens is a serene but slow process, and learning to take photos of them in this nightly dance isn’t much different. That first disappointing photo of the night sky drove me to learn more about stars and eventually take vastly better photos.
The night sky still amazes me every time I escape the city’s glow. No longer a teenage novice, I never tire from seeing the stunning results of a successful long exposure, and the beauty of lets me share that feeling with anyone.