IRAN ART EXHIBITION: A TUTORIAL ON A NEEDLE FELTING AND ITS TOOLS
In the world of crafting, needle felting is one of the cutest activities around. It’s simple in concept but looks complex in execution, and the results are elaborate sculptures made completely out of wool. Essentially, the activity uses a special needle to fuse fibers together in a stiff form. Animals are a popular subject for needle felting as their real-life fuzziness is ideal for the fuzziness of the fibers.
What is Needle Felting?
To understand needle felting, you’ve first got to be familiar with the general felting process. During felting, the fibers of wool are agitated—essentially moved back and forth—until they lock together in a tight bond. When creating sheets of wool felt (like the kind you’d typically see in a craft store), this process is done using hot water. Needle felting, while it mimics the process, is agitated with a needle instead of liquid.
The type of needle used for this craft is very important. A felting needle has tiny barbs on the end of it that are pointed in one direction. When the needle is stabbed into the wool, the barbs pull the fibers in, but not out, thus creating the bond. Because you’re stabbing the fibers over and over again, you’ll want to use a “cushion,” or a dense foam pad that protects the needles from breaking while also giving you a firm work surface.
“Stabbing” Wool, a Basic Needle Felting Approach
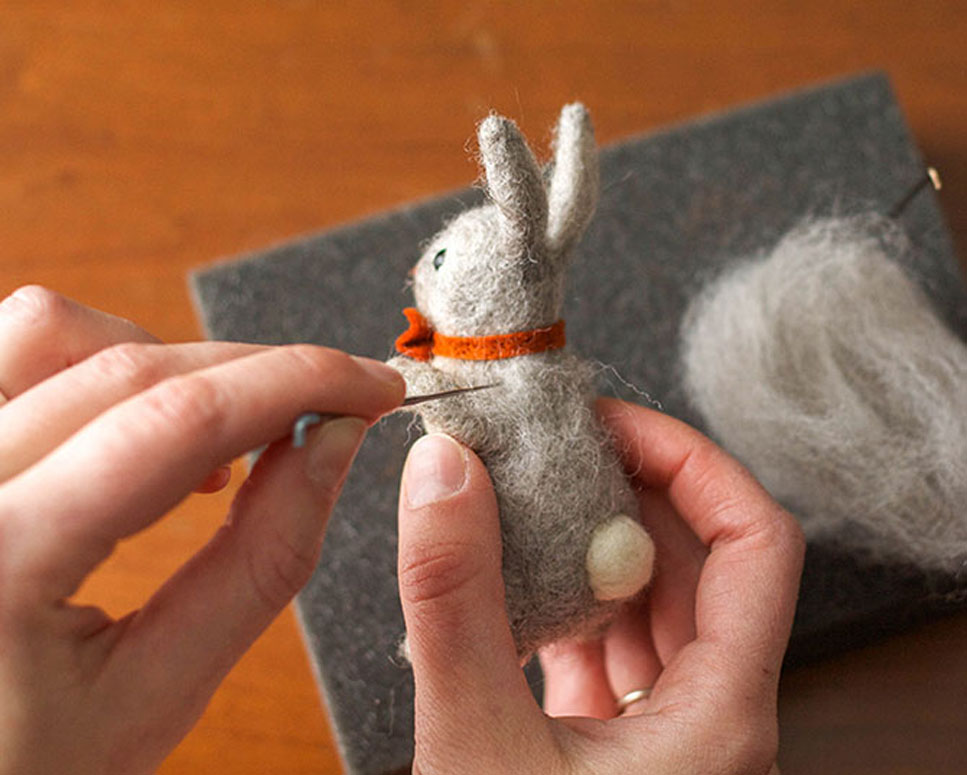
Needle felting is consistently referred to as “stabbing,” which is the motion that you make when pushing the needle into the wool and pulling it out again. To begin the entire process, you will roll a small amount of wool roving and begin puncturing it with the needle. Continue this motion over and over again; this will agitate the wool fibers so that they’ll lock together and produce a firm, round shape.
HERE’S A BEGINNER TUTORIAL ON A NEEDLE FELTING:
IRAN ART EXHIBITION: To build felt sculptures, you’ll use the same stabbing technique to construct a basic, solid form. You’ll then add the wool to it, stabbing the joints so that they’re fused to one another. Depending on the sculpture, you might want to incorporate armatures (like wire) to make it more stable. To decorate the surface of the felt—such as putting spots on a leopard—you’ll again stab a piece of roving into the wool exterior.

Needle Felting Supplies
If you’d like to try needle felting, it’s easier than you think to get started. Here’s what you’ll need.
Needles, handle, and scissors. Bundled as a pack, this kit has felting needles and a wood handle to secure them. It lets you work faster without losing the quality of your work. There is also a pair of scissors included.
60 colors of wool roving. Get the colors of the rainbow—and then some—with this set of 60 wool roving.
Foam needle felting pad. This will give you a firm work surface that protects your needles from breaking.
Needle Punch/Felting?
Needle Punch/Felting is the process of using barbed needles, either by hand or machine, to turn wool fibers into a more condensed material. The needles are pushed repeatedly through the fibers locking them together. There are many applications for needle felting, from creating dimensional objects like felted animals, to creating designs or adding texture to existing designs. Needle Felting is also referred to as Needle Punch. Needle Felting can be done by hand with a single needle to get details on an object or with a multi-needle felting tool and by machine with specialized needles and needle plate.
Benefits of Needle Punch/Felting
• Needle Punch/Felting is a way to add textural effects to art quilts.
• Needle Felting can be used to add designs to clothing.
• 3-Dimensional objects can be made with Needle Felting.
Tools and Supplies for Needle Punch/Felting
IRAN ART EXHIBITION: You’ll need the following to start Needle Punch/Felting:
• Wool roving or other fibers for felting
• Felting needle or felting needle tool
• Felting presser foot or felting machine
• Felting surface when felting by hand
What I Wish I Knew When I Started Needle Punch/Felting
NEEDLE PUNCH/FELTING can be used for mending and to add amazing texture and color to your quilts. Watch out for the needles! They are very sharp and do not bend.
The Wool
The wool fiber is surrounded by flat, overlapping scales. When processed, the fibers are mixed in their orientation and the scale edges may point in opposite directions. Therefore, the orientation of the fiber and subsequently the direction of the scale edges are random. When wool is subjected to agitation such as felting – the edges on the scales come in contact with each other, and do not allow the wool fiber to slide back, “locking” the fiber into position. It is not just one or two fibers that are locking together, but literally hundreds of fibers that come in contact with each other and lock into this position – causing the wool to felt.
The Felting Needles
The felting needles are a special kind of needle that have tiny barbs on the end. The barbs are going in one direction and when the needle is stabbed into the wool the barbs pull the wool in, but not back out again causing the wool fibers to tangle and their scales to lock together and felt.
The Felting Cushion
The pillow or cushion is used as a surface to work on. When you stab the needle into the wool it needs to have something to go into instead of the table or your leg.
The Process
Needle felting is begun by rolling up a small amount of wool and stabbing it with the needle. When the wool is stabbed with the felting needle it pulls the wool into itself. By stabbing the wool with the needle over and over while turning the wool it continues to pull wool into itself and the wool, with its tiny scales, locks together. Continued stabbing and turning results in a firm round shape. Once there is a basic shape to start with wool is added where it is needed to form a sculpture.
Felted 3D Sculpture
These pictures show the steps that I take in making a sculpture out of wool. I start out with a basic shape and add wool to make the main body. I look at pictures of animals to get an idea of the proportions. I use wire in the legs to make them more stable. It can be tricky felting around wire and so this is probably my least favorite part. (new wireless techniques are taught in the Academy) Sometimes I start by making the head, but other times I make the head last. When I am happy with the shape of the animal I make sure that it is felted smooth and very firmly. It is important for it to be firm when adding spots. The spots are last and they take awhile, but are fun to watch the progress. A project like this takes several days to complete.
Wool
IRAN ART EXHIBITION: I use many different types of wool in my needle felting. The wool that I use the most is Romney. This is primarily because we raise Romney sheep but I am convinced it is one of the best. I have tried other wool and always come back to my Romney. Romney felts very firmly so that you can have a very solid piece when you are finished. Other wools stay somewhat squishy no matter how much they are felted. With Romney there are no loose, flyaway hairs sticking out all over when you are finished. It felts very smooth. I like Merino wool for it’s softness and use it primarily for flat felting. I like Wensleydale for it’s shiny curls. I haven’t used all the types of wool but I have found some favorites.

Wet Felting
Some of my projects and kits include some wet felting techniques. Wet felting is similar to needle felting only hot soapy water is used instead of needles. Most of my flat felted pieces of sculptures are wet felted. This makes them smooth and easy to use, just like a piece of felt fabric in a store. When wet felting the wool fiber is laid out flat and rubbed using your fingers and hot soapy water. This helps the wool to tangle up and lock together. After much careful rubbing there is a nice flat piece of felt that can be cut into any shape and added to your 3D sculpture. My kits and Needle Felting Academy include detailed instructions, pictures and videos on how to do this technique as well as personal guidance if needed.
What is roving?
IRAN ART EXHIBITION: Roving is wool that has been washed and run through a carding machine. When carded the wool fiber is all going in the same direction. Carding is like combing in that it is taking the fiber that is in small locks and combing it all smoothly together. The carded wool comes out in a long “roving” of wool that is easy to spin into yarn. It is also fluffy and easier to felt with as well.